If you're looking for a way to become more self-sufficient and enhance your backyard harvests, look no further than apple tree grafting. With this surprisingly simple technique, you can transform your apple trees into high-yielding, disease-resistant superstars that will provide you with an abundant harvest year after year.
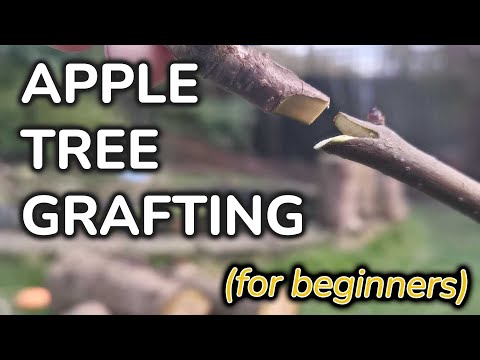
Grafting is an ancient technique used to ‘fuse' two trees together into one. It is mostly used to create ‘clones' of a certain tree; say, a particular variety of apple that you want more of. The process involves taking a scion (or cutting) from one tree and attaching it to the rootstock (or base) of another tree.
Anyone can do it and it can be done at home, in your own backyard, to create your very own apple trees from varieties you find out in the wild. Be sure to choose varieties that you enjoy or have characteristics that you'd like (such as long-keeping, flavour, colour, etc.)
For instance, last Autumn, I stumbled upon a hidden gem of an apple tree – the best I'd ever found out in the wild – and, after picking bag-fulls of apples from it that tasted delicious, I knew I wanted to ‘clone' the tree and make my own.
I'm not sure what variety it is but it tastes delicious. It also stored well (at least 3 months). I wrote a guide about how I stored the apples without refrigeration for the winter over here.
Now, in February (the following Spring), I will do my grafts and this guide will go through the process. I'll explore the steps involved in grafting apple trees, the benefits of grafting, and the types of grafting methods available.
I'll also show you how to select the right scions and rootstocks, walk you through the grafting process step-by-step, and share tips that I've picked up along the way on aftercare and maintenance.
Get ready to revolutionize your backyard orchard and unleash its full potential with the simple magic of apple tree grafting!

Apple Tree Grafting: The Proven Technique for Boosting Your Yields and Achieving Self-Sufficiency
Apple tree grafting is an essential technique in apple tree cultivation, particularly if you're a cash-strapped backyard apple grower or someone whose apple orchard is part of your purposeful plan towards self sufficiency.
It's also an ancient technique, and there's something intimately wondrous about creating more of something you love simply by taking a piece of it and helping it grow.
It works like this: by grafting a scion of a desirable apple variety onto a ‘rootstock', you can create a new tree that exhibits the best qualities of both trees. For example, the rootstock can provide disease resistance and drought tolerance, while the scion can provide improved fruit quality, flavour, and yield.
Grafting also allows you to propagate apple trees without relying on seeds, which can be unreliable and produce fruit with unpredictable characteristics.
Grafting Methods
There are several different grafting methods used for apple trees, each with its own advantages and disadvantages. The most common methods include whip grafting, cleft grafting, and bud grafting. I use cleft grafting mostly, but only because my grafting tool makes it super easy.
- Whip Grafting: This method involves cutting both the scion and the rootstock at a 45-degree angle, making a clean cut with a sharp knife. The two cut surfaces are then aligned, and the two pieces are taped or tied together until the graft union is secure. Whip grafting is a simple and effective method, but it requires precise alignment of the scion and rootstock.
- Cleft Grafting: Cleft grafting involves cutting a wedge into the center of the rootstock and then inserting the scion into the opening. The scion is then secured with tape or a grafting compound. Cleft grafting is a good method for larger rootstocks and scions, but it requires more skill and precision than whip grafting.
- Bud Grafting: Bud grafting is a method of grafting that involves removing a bud from the scion and inserting it into a T-shaped cut in the rootstock. The bud is then secured with tape or a grafting compound. Bud grafting is a good method for propagating trees from scions that have limited growth or are difficult to root.

Steps to Graft an Apple Tree
Now that you have a basic understanding of the different apple tree grafting methods, let's dive into the steps involved in grafting an apple tree using my favourite method; the cleft grafting method. I should say, before I had a grafting tool, I used to use wedge grafting and still had success. I'd say my grafts took about 80% of the time with this method.
Step 1: Gather Materials
To graft an apple tree, you will need:
- A scion from the desired apple tree variety
- A rootstock from a compatible apple tree
- Grafting kit (buy one here)
- Grafting tape or twine
- Grafting wax or compound (this is the one I use)
- Sterilizing solution (such as rubbing alcohol)
Step 2: Prepare the Scion
Choose a healthy, vigorous scion from a mature apple tree that has the desired characteristics you want to propagate. Especially those of locality – choose an apple that grows in your climate!
Choose the right scion
- Select scion wood from a healthy and vigorous tree: Choose scion wood from a healthy, disease-free tree that has good growth and has produced high-quality fruit. Avoid using wood from a stressed or weak tree, as this can compromise the success of the graft.
- Use scion wood that is the right size: The scion wood should be about the same size as the rootstock, or slightly smaller. If the scion is too large, it may not form a strong union with the rootstock.
- Collect scion wood in late winter or early spring: Scion wood should be collected during the dormant season, when the tree is not actively growing. Late winter or early spring is the best time to collect scion wood, as this is when the buds are just beginning to swell.
Preparing the Scion
When you're ready to graft your scion to your rootstock; use your grafting tool (or pruning shears or a sharp knife) to make a cleft cut just below a bud.
Doing this just below a bud is important because it encourages energy from the rootstock to try and grow the bud and this helps the graft take and heal.

Step 3: Select & Prepare the Rootstock
Select a healthy rootstock that is compatible with the scion and, most importantly, your local climate. In the UK, there are several types of rootstock available for apple tree grafting. Some common types include:
- M27 – This is a dwarfing rootstock that produces small trees, making it ideal for small gardens or containers. Trees on M27 rootstock usually grow to around 1.5-2 metres in height.
- M9 – Another dwarfing rootstock, M9 produces slightly larger trees than M27, but is still relatively small, reaching around 2.5 metres in height.
- MM106 – This is a semi-dwarfing rootstock that produces medium-sized trees, typically around 3-4 metres in height. MM106 is a popular choice for backyard orchards and larger gardens.
- M26 – Similar to MM106, M26 is a semi-dwarfing rootstock that produces medium-sized trees, but is slightly more dwarfing than MM106. Trees on M26 rootstock usually reach around 2.5-3.5 metres in height.
- M7 – This is a semi-vigorous rootstock that produces larger trees, typically around 4-5 metres in height. M7 is a good choice for larger gardens or orchards.
- M25 – This is a vigorous rootstock that produces the largest trees, typically around 6-8 metres in height. M25 is a good choice for large orchards or commercial growers.
When choosing a rootstock, it's important to consider factors such as the size of the tree you want to grow, the soil and climate conditions in your area, and the type of apple you want to grow. Different rootstocks can affect the growth, yield, and disease resistance of the apple tree, so it's important to choose the right one for your specific needs.
For my back garden, I tend to choose M26, which keeps the tree size manageable.
Once you have your rootstock, cut the rootstock to the desired height and make a clean cut to fit the cleft cut on the scion. Remove any branches or leaves from the rootstock near the grafting area.

Step 4: Make the Graft
Align the scion and rootstock, making sure that the cambium layers (the thin layers of greeny-white tissue just under the bark where growth occurs) of both pieces match up. The cambium layers need to be in contact for the graft to be successful.
Wrap the graft union tightly with grafting tape or twine, leaving the buds exposed. The tape or twine should be tight enough to hold the graft in place but not so tight that it cuts off the flow of sap.
The grafting kit I use comes with all the appropriate tape and tools you'll need to do successful grafts.

Step 5: Apply Grafting Wax, Tape or Compound
Apply a grafting wax or grafting tape or other wound-healing compound to the graft union to protect it from moisture and disease. This also helps keep the graft union in place. Be sure to cover the entire graft union with the wax, tape or compound.
Step 6: Monitor and Care for the Graft
After grafting, monitor the graft union closely to ensure that it takes. The scion and rootstock may take several weeks or even months to fully fuse together.
Once the graft has taken, the tree should be treated as a single tree, and the scion will grow and produce fruit with the desired characteristics.
Final Thoughts On Apple Tree Grafting
Grafting apple trees is a useful technique for propagating trees with desirable characteristics. It is cost-effective and can be done at home in your own backyard.
It requires a little patience and skill, but is achievable even if you've never done any grafting before. You only have things to gain by trying.
Not only can it help you build your own orchard for very little cost, it can also result in a more disease-resistant, productive, and flavourful apple tree.
By following the steps outlined above and using the tools I use, you can successfully graft apple trees using the cleft grafting method.
Remember to choose healthy scions and rootstocks, align the cambium layers carefully, wrap the graft union tightly, apply grafting wax or compound, and monitor the graft closely. With proper care and attention, your grafted apple tree will produce delicious fruit for years to come.