Are you looking for a safe way you can do some rainwater harvesting for drinking water? Rainwater harvesting is a cheap and easy way you can capture rainwater and turn it into drinking water and, in this guide, I'll show you how to do it safely.

Harvesting rainwater for drinking has become somewhat of a lost art in our modern world, but let me tell you, for those frugal homesteaders and seekers of self-sufficiency that relearn this age-old skill, they quickly find themselves saving money, drinking fresher, cleaner water and feeling more independent and resilient in a fragile system.
Not to mention the health benefits of detoxification that occur as a consequence of drinking fresh, neutral ph rainwater.
It's not new either. Our ancestors, going back at least 4000BC, had devised ingenious ways of harvesting and distributing rainwater.
Not only ingenious ways, but beautiful ways.
The Basillica Cistern in Istanbul, Turkey, for instance, was built to provide water to the Great Palace of Constantinople and receives 88000 cubic metres of water from 2 aqueducts, the Valens Aqueduct, some 12 miles long and the Maglova Aqueduct, almost half the length.

Whilst you may not live in something as grand as the Great Palace of Constantinople, you can still use the same techniques to capture, store and distribute water anywhere on your property.
In this guide, I'm going to show you a simple rainwater harvesting for drinking water setup:
- How to capture rainwater
- How to filter rainwater
- How to purify it so that it is safe to drink.
The Simple Method For Rainwater Harvesting for Drinking Water
The most simple method of rainwater harvesting for drinking water is to collect filtered rainwater from a collection surface like a roof into some storage tanks (like I did with my gravity-fed watering system) and then manually pour some of that water into a Big Berkey Water Filter in your house which purifies the water and makes it potable (safe to drink).
The remainder of this guide will go into more depth about rainwater harvesting and the different methods and components you need to make your own system.
Different Methods of Rainwater Harvesting for Drinking Water
There are are 4 broad categories of rainwater harvesting systems:
Rooftop-Based Systems
- Rooftop Collection System
- Surface Runoff Collection
- Rainwater Catchment System
- Rain Gardens (often involve collecting runoff from roofs)
Storage-Based Systems
- In-Ground Storage Systems
- Above-Ground Storage Tanks
- Ferrocement Tanks
- Subsurface Dams
- Green Roofs (involves storage within vegetation)
Natural Landscape-Based Systems
- Swales and Contour Trenches
- Rock Catchment System
- Rainwater Harvesting from Trees
Innovative and Specialised Systems
- Permeable Pavement
- Fog Harvesting
- A-Frame Roof Collection
For the purpose of this guide, I'm going to showcase the simple rooftop collection system which anyone can install but I wanted to list all the different methods of rainwater harvesting you could use depending on your individual context.
What Is A Rooftop Rainwater Harvesting System?
A rooftop rainwater harvesting system collects rainwater directly from rooftops using gutters and downspouts. The collected rainwater is directed into storage tanks or containers for later use.
What Components Do You Need To Build A Rooftop Rainwater Collection System

There are 6 basic components to a domestic rainwater harvesting system:
- The Catchment Surface: the collection surface from which rainfall runs off
- Gutters and downspouts: channel water from the roof to the tank
- Leaf screens, first-flush diverters, and roof washers: components which remove debris and dust from the captured rainwater before it goes to the tank
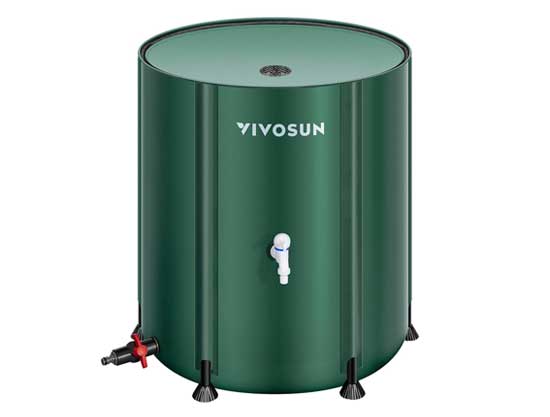
- Storage Tanks: One or more storage tanks, also called cisterns
- Delivery system: gravity-fed or pumped to the end use
- Treatment/purification: for potable systems, filters and other methods to make the water safe to drink
The Catchment Surface

This could be your house roof, your garage roof (like mine) or any other roof you have access to.
I've known people build open-walled rainwater sheds just for the purpose of catching rainwater and housing cisterns, pumps and filtration systems.
For most of us, it makes sense to use our roofs as there is no additional construction required.
All you need is a way to divert the water to a storage unit from the roof and because most roofs usually drain down through a small number of gutters and downspouts, it's easy to tap into one of those to catch rainwater.
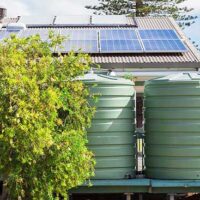
Here is my rooftop and gutter, downpipe, diverting pipe and and storage unit setup I use to catch my rainwater.

Gutters and Downspouts: How To Divert Rainwater From Rooftops
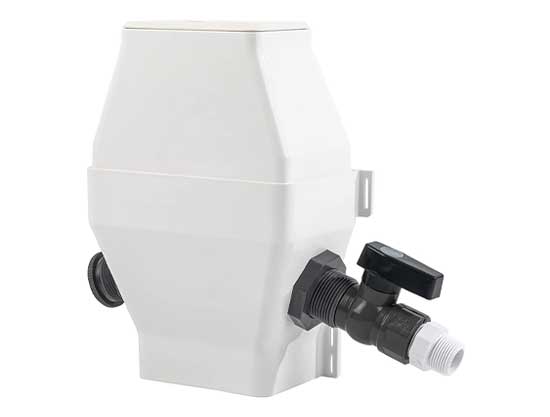
In a simple rainwater harvesting system like this, where you plan to tap into a downpipe to divert some of the rainwater to a storage tank; the only components you need to make it happen are (assuming you have a gutter, of course!):

Leaf Screens and Particle Filters
When harvesting any rainwater, you should aim to remove as many particles at the source as possible.
This is especially so when rainwater harvesting for drinking water, because removing particles at source makes the rest of the process easier.
The first line of defense in your rainwater harvesting system should be your leaf screen or particle filter.
These are simple, mechanical wire mesh screens that filter out particles over a certain size.
They come in many styles; wire mesh that run the full length of your gutter or simple filtration blocks like the one shown here.
Either way they filter out a lot of the gunk you don't want in your drinking water.

‘First Flush' Filtration System
In any rainwater harvesting setup, it's advisable to add in a ‘first flush' filtration system. The rainwater diverter I showed above has a built-in manual ‘first-flush' outlet.
What is first flush in rainwater harvesting?
The first flush system in rainwater harvesting is the part of the system which diverts an initial volume of rainfall to a separate storage tank or outlet. It prevents contaminants from the collection surface from entering the primary water storage tank.
The amount of water you ‘flush' initially is arbitrary and would depend on your collection surface area, the pollutants you expect to be in your water etc.
For most household roofs though, 5 gallons is considered enough to first flush.
How Does A First Flush System Work?
In the example above, using the recommended components, you would have two storage tanks:
- A small 5 gallon tank
- Your large 50 gallon tank
You'd initially have your first flush diverter set so your primary outlet (to the 50g tank) is closed and your first flush outlet is open.
After the first 5 gallons of rain has fallen and your first flush tank is full, you would manually close the first flush outlet and open up your primary storage outlet.
This ensures that your primary storage tank only receives contaminant-free water (providing of course you have your rainwater harvesting leaf screens in place too).
You would then empty your first flush tank ready for the next time. You could use the first flush water to water your garden.
Automated First Flush Diverters
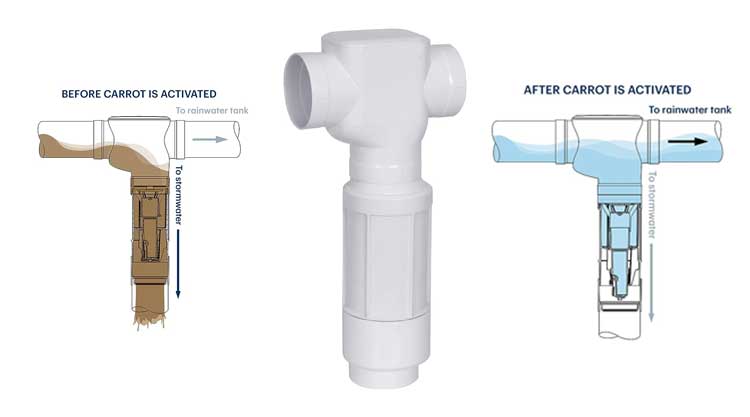
If you don't want to have to switch between outlets manually, you can also buy automated first flush diverters that take care of the switching between primary and first flush outlets automatically.
This is an example of a 5 gallon automated first flush diverter:
Rainwater Storage Tanks
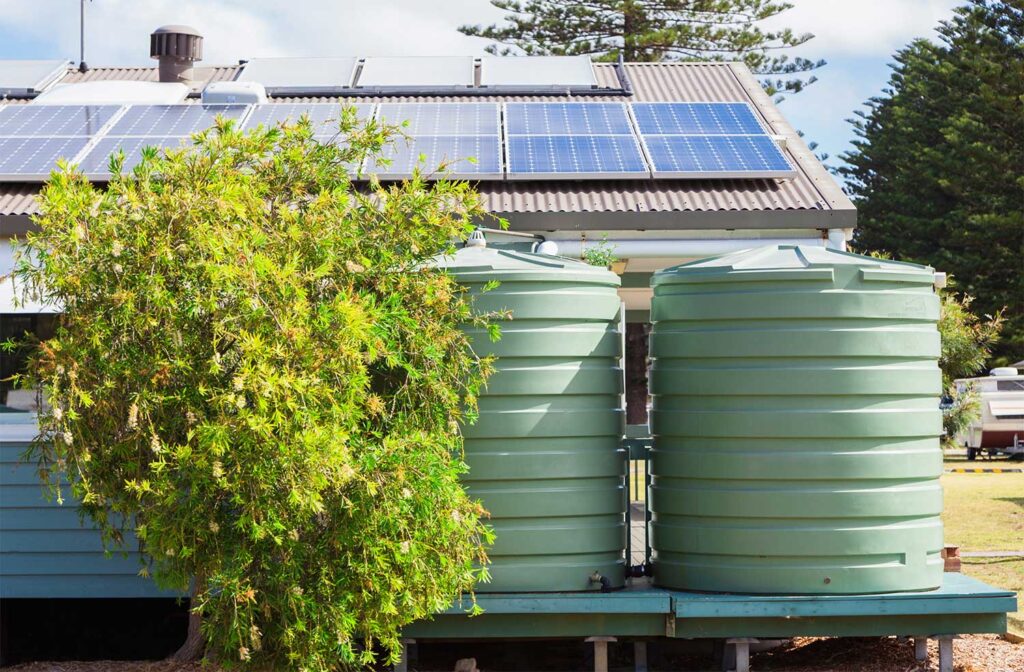
Although it's usually the first thing people think of when designing their own rainwater harvesting for drinking water system, it's actually the least complicated part of the entire system.
The primary considerations for storage are:
- How much water you need to collect (use our rainwater harvesting calculators to find out)
- Your total collection potential
- Where to site your storage tanks
- Cost
As with most things, you can have as big and elaborate a design as you can imagine (like secret tanks hidden underground) or as small as you can imagine.
We created a selection of rainwater harvesting calculators to help you work out how much rainwater you can collect from your intended surface and how much storage you're going to need.
Based on that information, you can choose the most appropriate rainwater storage tank for your situation; whether that be an underground rainwater storage tank, standing tank or slimline rainwater tank.
In the case of rainwater harvesting for drinking water, the storage tank you buy will need to be suitable for potable water.
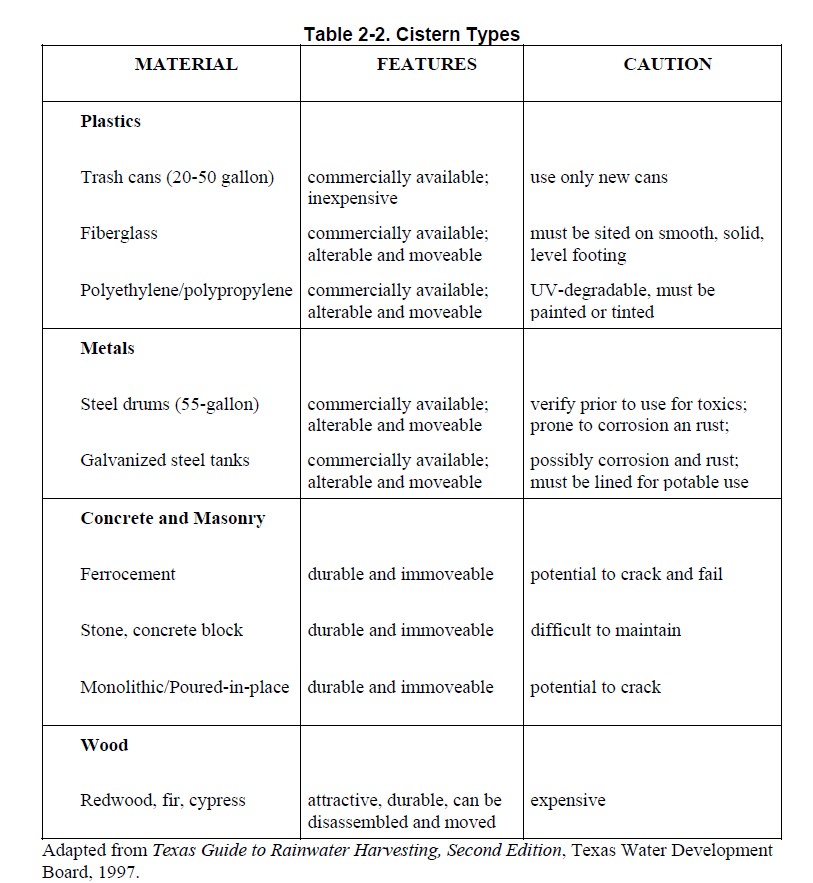
Different Types of Rainwater Storage Tank/Cisterns
The following table was taken from the Texas Guide to Rainwater Harvesting, 2nd Edition, 1997. I couldn't find the original link so I linked to the newer 3rd edition instead.
Rainwater Distribution and Delivery System
To meet the needs of the household, water needs to be moved from the storage tank to the outlet point when the need arises.
There are typically 2 ways to achieve this:
- Gravity-fed distribution
- Pumps
What Is A Gravity-fed Water System?
A gravity-fed water system is a method of delivering water via the force of gravity. Water is stored higher than the outlet point and gravity forces the water out when the tap is opened.
The problem with gravity fed watering systems is that most household appliances require at least 20-30 psi of water pressure to function correctly (like a dishwasher or washing machine).
How Much Pressure Does A Gravity-Fed Water System Create?
Water gains 1 psi of pressure for every 2.31 feet of vertical rise; so for gravity flow through a 1-inch pipe at 40 psi, the storage tanks would have to be more than 90 feet above the house.
This data was provided by the Texas Rainwater Harvesting booklet and if you want to learn more about how water pressure is calculated, visit vcalc.
What this means for most people is that a true gravity-fed watering system for household water drinking water is not possible; so you have to use a pump.
You can use gravity-fed watering system to irrigate your garden however, which is what I do in my automated greenhouse irrigation system.
Rainwater Delivery System: Do You Need a Pump?

If you want a simple rainwater harvesting for drinking water setup where you don't need to supply household appliances that require 20 PSI or higher, you could store all of your rainwater in your storage tank then manually go and fill up jugs or jars from your tank and pour them through a water filter; like a Big Berkey Water Filter to make it potable and safe to drink.
If you want a more complex setup, where you pump your rainwater into a tap inside the house or need more PSI to supply a household appliance or to move water greater distances (or up heights), you will need to add an on-demand inline pump into your setup.
How To Get High PSI From a Rainwater Storage Tank
You can use either an inline pump or a pressurised storage tank to get a higher PSI (pressure) from your rainwater storage tank.
You could use this higher pressure to distribute water further or higher from your tank or to supply household appliances.
Inline On-Demand Water Pump For Rainwater Harvesting
An inline pump works by simply connecting the inlet on the pump to the rainwater storage tank and the outlet on the pump to your fawcett or hose where you need the higher pressure.
An inline pump is self-contained and powered by electricity so you will need an electrical connection point nearby or an extension.
Some people build pump housing to protect the pump and dampen the sound.
An inline pump like the one below will keep your outlet pressure at around 45 PSI on-demand (so, when you turn on the tap).
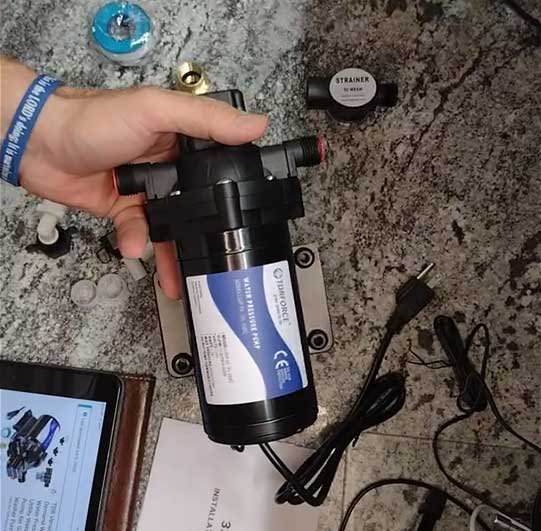
An electric inline pump that fits into your distribution line between your rainwater storage and your outlet point to keep pressure at 45 PSI.
This particular model also has a 50 mesh inlet strainer built in to filter out particles.
Pressurised Storage Tanks
The other method to create a high pressure water source from rainwater is to transfer some of your stored rainwater into a pressurised tank.
This video from Homesteadonomics does a great job of explaining it but essentially, you have a pump attached to your storage tank which primes the pressure into a pressurised tank.
When pressure is reached inside the pressurised tank, the pump turns off and only turns back on when pressure drops inside the tank.
This type of system is mostly used when you want to supply your home with rainwater from your rainwater storage tanks.

How To Treat and Purify Rainwater Harvesting For Drinking
There are two stages of rainwater treatment.
- Filtering out particle contaminants at source
- Killing off bacteria
We already discussed the process of filtering out contaminants at source using leaf screens, gutter guards and first flush diverters so we don't need to cover that again here.
The second stage is bacterial sterilisation.
The Texas Rainwater Harvesting Guide has a good table you can refer to for forms of water treatment which you can see below.
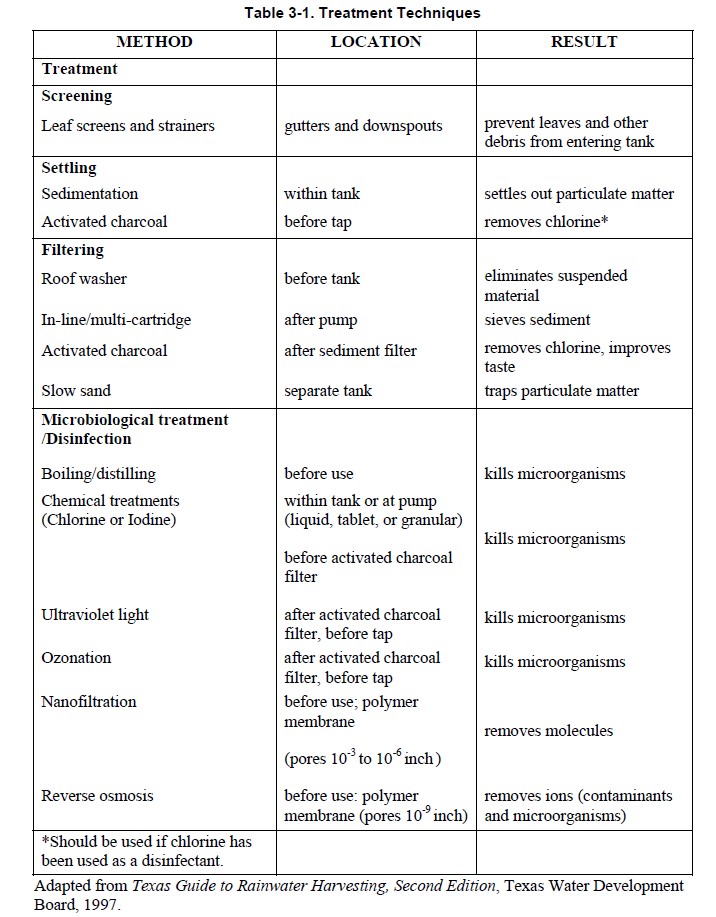
How To Kill Bacteria In Rainwater And Make Water Potable
The second stage of filtering is the removal or sterilisation of microbiological contaminants; E. coli, Cryptosporidium, Giardia lamblia, total coliforms, legionella, fecal coliforms, and other so-called viruses.
There are 3 well-known methods for water treatment and purification to make rainwater potable:
- Chlorination
- UV light
- Micron filtration
Chlorination: Do not use this method!
Chlorination was a widely used method for rainwater purification that emerged from around 1908 but it is somewhat an outdated mode of purification these days, with safer methods like UV light and Micron filtration more preferable.
Not to mention that water treatment with chlorine has been linked to the formation of trihalomethanes in the water which, in turn, was found to increase the growth of cancer in rats.
I only included it here so you know not to use it.
UV Light
Ultraviolet (UV) light purification is an eco-friendly method that harnesses the power of UV rays to disinfect rainwater.
UV-C light, which is harmful to microorganisms, is used to target and disrupt the DNA of bacteria, viruses, and parasites, rendering them unable to reproduce or cause harm.
UV purification is highly effective and leaves no chemical residues in the water, making it a popular choice for rainwater treatment.
However, it may not remove particulate matter, so a pre-filtration step is often recommended.
Micron Filtration
Micron filtration involves passing rainwater through a series of filters with varying pore sizes to physically remove contaminants.
These filters can range from coarse screens to fine membranes, depending on the desired level of purification.
Larger particles like debris, sediment, and even some microorganisms are trapped, leaving behind cleaner water.
Micron filtration is effective in improving the clarity and quality of rainwater, but it may not eliminate all microbial threats, so it's often combined with other methods like chlorination or UV treatment for comprehensive purification.
What Is The Best Way To Purify Rainwater For Drinking?
A combination of UV Light + Micron Filtration is the best way to purify harvested rainwater for drinking. UV light kills of bacteria and leaves no residue and micron filtration removes all particulates.
How To Purify Rainwater With UV Light and Micron Filtration And Make It Safe To Drink
To purify rainwater and make it safe to drink with UV light, you first need to remove particulates with a micron filter (usually an activated carbon filter) and then you need to pass the water through a UV light filter.
You remove particulates first so that no living bacteria can ‘hide' behind any particulates and survive the UV light treatment.
This is usually a UV light tube with a flow rate that matches the flow rate of your pump to prevent the water from passing through too quickly.
As the water passes through the tube, UV light is shone onto the water and kills off bacteria.
UV light filtration is considered the gold standard or ‘catch-all' in bacteria sterilisation for potable drinking water but you can also get completely safe drinking water by running your water through a Big Berkey Filter system too.