If you learn how to store fruit in mason jars properly, you'll be able to preserve your fresh fruit harvest for years without power, ensuring you and your family are well stocked up in sweet treats to ride out any disaster.

Why Store Fruit In Mason Jars?
Contrary to popular modern-day belief; fruit does not grow all year round.
It is seasonal and when that season is past, we have to wait another year for the next harvest.
Yet, when fruit is in season, nature tends to provide such enormous bounty that it's almost impossible to eat all at once.
This is why we preserve fruit. It is why our ancestors preserved fruit.
This ritual, often passed down from generation to generation, encapsulates more than just fruit; it captures memories, seasons, and the very essence of the fruit’s peak freshness.
Not to mention all the vital nutrients our summer fruits contain to keep us healthy.
If we don't find a way to safely preserve or store our bounty when it's ready, the fruit spoils and we can't eat it.
Humans have, over millennia, found many ways to preserve food for the long term, but one of the simplest methods that anyone can do is to store fruit in mason jars.
If done correctly, fruit preserved this way will last for years.
The process for storing fruit in jars
The actual preservation method is very similar to the process used commercially to store fruit in tins:
- Harvest and prepare fruit
- Fill preserving jars with fruit
- Cover fruit with preserving syrup
- Seal jars
- Place jars into a water bath canner and bring to the boil for at least 10 minutes depending on the fruit and recipe
- Remove jars and check to see if a vacuum seal has been formed
- If so, you're all good
What Equipment Do You Need To Store Fruit In Mason Jars?

As any self-respecting homesteader will tell you; having the right tools is half the battle.
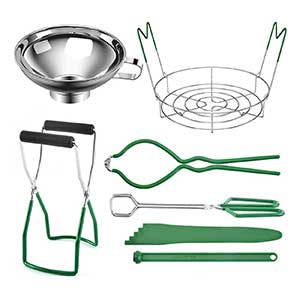
Preserving fruit in jars is no exception and here's my simple list of equipment you'll need if you want to start storing & preserving your own fruit in jars:
- Water Canner: this is a specialist large pot, also known as a ‘water bath canner.' Don't have a water bath canner? Don't worry; that large metal stock pot you've been using for soups and spaghetti nights will do. It just needs to be deep enough to cover your jars with a good inch or two of bubbling water.
- Metal Rack: you will need either a metal or wooden rack you can place at the bottom of your stock pot or canner. This is to keep the bottom of the jar from the bottom of the pot and help prevent any cracking. At a pinch, you could use any bits of wood you've got laying around to raise the jars from the bottom.
- Mason Jars: before using any jars, it's crucial to give each jar a keen once-over, watching for any cracks or nicks. For the best results, invest in jars purposefully crafted for home canning/preserving. You can, of course, use existing, used jam jars or curry jars or sauce jars or whatever other jar you have available as long as it still has a good rubber seal around the lid. If there's any sign of wear, you should probably discard that lid.
- What size mason jars do you need? Stick to the classic trio: half-pint, pint, and quart if you can, especially for your fruits. They give plenty of room to do the job.
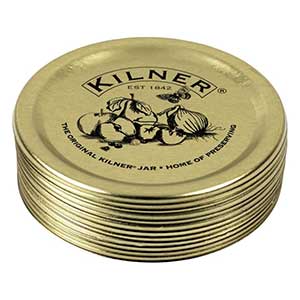
- Jar Lids: mason jar lids typically come in two styles; flat discs with rubber sealing compound attached to the lids, and rubber ring bands that can be used over and over provided they remain in tip-top shape.
The Essential Equipment I Use To Preserve Fruit In Jars

How To Sterilise Used Glass Jars
You can sterilize used glass jars by fully submerging them in boiling water for a solid 10 minutes. This is more than enough time to kill any live bacteria on the jars.
How To Prepare Fruit To Store In Mason Jars
Choose the best fruits
- Only preserve edible fruits fresh from the harvest. The less time between the orchard and the jar, the richer the flavor.
- If you're purchasing fruits, try to get as close to source as possible and as close to harvest day as possible.
- To ensure uniform cooking, categorize your fruits by size and maturity.
- Every fruit, irrespective of whether you plan to peel it, should be washed with chemical free water if you have access to it.
- This is especially important if you're buying from supermarkets because most fruit delivered to supermarkets is coated in one sort of synthetic preservative or another.
- Avoid soaking your fruits though as this will leech their flavour and nutrients.
- Don't use any fruit that is bruised.
How To Maintain Original Fruit Color
Some fruits tend to lose their vibrant colour when exposed to air. To avoid this, consider these treatments to keep them looking fresh:
- Immerse the fruit in a Vitamin C solution combining 1 teaspoon (or 3000 mg) ascorbic acid (a source of Vitamin C) with 1 gallon of water.
- Utilize a ready-made ascorbic acid concoction available at grocery or pharmacy outlets. Always adhere to the container's guidelines.
Keep your fruits in these solutions till they're ready for the canning stage, then ensure they're adequately drained.
What Liquid Preserves Fruit Best?
Fruits can be preserved in water, juice, or syrup.
Different fruits will taste better or worse in different preserving liquids.
It is the combination of sugar in the preserving liquid and the processing method (which we'll go over below) that preserves the fruit.
How Is Sugar Syrup Made?
Sugar syrup is made by mixing water or juice (extracted from the fruit) with sugar. The mixture is heated to dissolve the sugar and is kept very hot until ready for use.
Choose one of the syrups in the chart below to suit the sweetness of the fruit and your own taste.
Different Types Of Preserving Syrups For Fruits
| Type of Syrup | Percent Sugar* | Cups of Sugar Per Quart Liquid** | Yield of Syrup In Cups* | How Syrup Is Used Commercially |
| Very Light | 10% | 1/2 | 4 1/2 | |
| Light | 20% | 1 | 4 3/4 | Very sweet fruit |
| Medium | 30% | 1 3/4 | 5 | Sweet apples, sweet cherries, berries, grapes |
| Heavy | 40% | 2 3/4 | 5 1/3 | Tart apples, apricots, sour cherries, gooseberries, nectarines, peaches, pears, plums |
| Very Heavy | 50% | 4 | 6 | Very sour fruit |
** In general, up to one-half of the sugar may be replaced by corn syrup or mild flavoured honey. A larger proportion of corn syrup may be used if very bland, light-coloured type is selected.
Processing: Filling The Jars With Fruit
You can pack peeled fruit raw into jars or preheat it and pack it hot.
Your mason jars should be clean, pre-sterilized and hot to prevent breakage if they are being filled with hot fruit.
How To Pack raw Fruit into jars (‘Raw Packs')
- Put prepared (washed & peeled) raw fruits into jars and cover with very hot (or boiling) syrup, juice or water depending on taste.
- Pack fruit tightly into the jars because raw fruit will shrink during processing.
How To Pack Hot fruit into jars (‘Hot Packs')
- Heat prepared fruits in syrup, water or juice before packing.
- Pack hot food loosely.
- Food should be at or near boiling temperature when it is packed unless specific directions indicate another preparation.
For either method, use enough syrup, water or juice to fill around the solid food in the jar and to cover the food completely.
See directions for each fruit for the correct amount of headspace to leave between the top of the food and the top of the jar. This headspace is important for obtaining a good seal.

Processing: Closing The Mason Jars Correctly
Once the jars are filled, you will need to remove any trapped air bubbles. Trapped air bubbles may prevent your jar from obtaining the vacuum seal necessary for long term preservation & storage.
If this happens, your food won't store and you'll have to water bath it again or eat it within a week.
To remove air bubbles from your jar:
- Slide a non-metallic (eg., plastic) spatula between the food and the sides of the jar and scrape your way around the sides of the jar.
- As you scrape, you'll notice air bubbles popping at the surface and the total volume of liquid may decrease as the air is released.
- Add more liquid if necessary to obtain the proper headspace.
- Once all air is removed, wipe the jar rim with a clean damp paper towel to remove any food particles or liquids.
- Place the flat preserving lid on the filled jar making sure you have it in the perfect position for a good seal.
- Screw the metal ring band down fingertip tight.
Processing: Canning The Fruit In Mason Jars
The process in this guide has been condensed from the original food preservation guide published by the UGA Extension to make it easier to read and consume.
- Fill the canner at least half full with clean hot water. Enough water is needed so that the level will be 1-2 inches over the tops of the jars after they are added.
- Center the canner over the burner and preheat the water to about 180°F (simmering) for ‘hot packs‘ and hot but not yet simmering (about 140°F) for ‘raw packs‘.
- Using a canning jar lifter, place filled jars on a rack in the canner containing hot or simmering water. Make sure the jar lifter is securely positioned below the neck of the jar and ring band and keep the jar upright at all times. Tilting the jar could cause food or covering liquid to spill into the sealing area of the lid.
- Add boiling water if needed to bring water to a level one or two inches over the top of the jars, pouring it between the jars and not directly on them.
- Put the cover on the canner. Turn the burner to its highest heat setting and bring the water in the canner to a full boil.
- When the water in the canner comes to a rolling boil, start to count processing time. Boil gently and steadily for the time recommended for the food being canned (see fruit boiling times in Table 2 below)
- Add boiling water during processing if it’s needed to keep jars covered.
- If the water stops boiling at any time during the process, bring the water back to a boil and begin the timing of the process over, from the beginning.
- When the jars have been processed for the recommended time, turn off the heat and remove the canner lid. Turn the lid so the steam escapes away from your face. Wait 5 minutes before removing jars.
- Using a jar lifter, remove the jars, being careful not to tilt them. Carefully place the jars right side up on a rack or dry towels to prevent jars from breaking on contact with a cold surface. Leave at least one inch of space between jars during cooling.
- Allow the jars to cool undisturbed, away from drafts, for 12 to 24 hours. Do not tighten ring bands on the lids or push down on the center of the lid until the lid is completely cooled. Even if a popping sound is heard as lids seal, leave the jar and lid untouched until completely cool.
Post-Canning Procedures: A Guide to Prolonged Freshness
Once you've expertly sealed your fruit favourites inside their mason jars and left them to cool for 24 – 48 hours, ensuring their long term freshness requires a few final steps:
- Seal Verification
Gently press down on the center of the flat metal lids. They should feel slightly concave and remain stationary and not ‘pop', signifying a successful seal. - Post-Canning Clean-up
If you used ring bands (and after the jars have cooled completely) remove the ring bands for cleaning. Wash and dry them thoroughly, ensuring their longevity for subsequent canning adventures. It's also crucial to wipe away any residual food particles from the jars and give them a final rinse to maintain their pristine condition. - Proper Labeling
To ensure you can easily identify your preserves in the future, attach a label to each jar. Mention the contents and the date of canning. This not only aids organization but also ensures you're consuming items while they're still at their peak. - Ideal Storage Conditions
Find a location that is both cool and dry. Whether it's a dedicated corner of your pantry or a special spot in the basement, when stored in these conditions, your canned goods will retain their optimal quality for about a year, but will be safe to consume for many years longer.
Managing Unsealed Jars
Occasionally, a jar may not seal perfectly.
In such cases, treat its contents as fresh produce. Consume it promptly, store it in the refrigerator, freeze it, or consider re-canning.
If you choose to re-can, it’s imperative to undergo the entire canning process again to ensure safety.
If It Looks Or Smells Off, It Probably Is
Always prioritize safety when it comes to your preserved goods.
Before diving into a jar's contents, ensure its integrity.
If you notice a jar's lid bulging or any leakage, it’s a clear sign of potential spoilage.
Upon opening, be on the look-out for tell-tale signs like unexpected spurts of liquid, an unusual odour, or the presence of mould.
Should you come across any of these signs, you should throw away the fruit preserves somewhere your children or pets can't accidentally eat it.
By being vigilant and diligent in this final stage and you will ensure that every bite from your pantry remains as delightful and safe as intended.
How Long Should You Boil Fruit For When Preserving In Glass Jars?
| Fruit | Pack | Preparation | Processing Time | Minutes |
| Apple Juice | Hot | For best results, buy fresh juice from a local cider maker within 24 hours after it has been pressed or press your own. Refrigerate juice for 24 to 48 hours. Without mixing, carefully pour off clear liquid and discard sediment. Strain clear liquid through a paper coffee filter or double layer of damp cheesecloth. Sterilize jars. Heat juice, stirring occasionally, until juice begins to boil. Pour into hot jars, leaving 1⁄4-inch headspace. | Pints/Quarts/Half-Gallons | 5/5/10 |
| Apples | Hot | Make a very light, light or medium syrup. Wash, peel, coreand slice apples. Treat to prevent darkening. Remove sliced apples from anti-darkening solution, drain and place in a large saucepan. Add 1 pint syrup, water or juice per 5 pounds apples. Boil 5 minutes, stirring occasionally. Pack hot apples into hot jars, leaving 1⁄2-inch headspace. Fill jar to 1⁄2 inch from top with hot syrup. | Pints/Quarts | 20/20 |
| Applesauce | Hot | Wash, peel and core apples. Treat to prevent darkening. Remove slices from anti-darkening solution and place drained slices in an 8 to 10-quart pot. Add 1⁄2 cup water. Stirring occasionally to prevent burning, heat quickly and cook until tender (5 to 20 minutes, depending on maturity and variety). Press through a sieve or food mill, if desired. If you prefer chunk-style sauce, omit the pressing step. If desired, add 1/8 cup sugar per quart of sauce. Reheat sauce to boiling. Pack into hot jars, leaving 1⁄2-inch headspace. | Pints/Quarts | 15/20 |
| Apricots | Follow directions and processing times for peaches. | |||
| Berries (except strawberries and cranberries) | Berries may be canned in water, juice or syrup. Prepare and (except heat the liquid of your choice. Wash, drain, cap and stem strawberries and if necessary. For gooseberries, snip off heads and tails cranberries) with scissors. | |||
| Hot | (Use for blueberries, currants, elderberries, gooseberries and huckleberries.) Heat to boiling, about 1 gallon of water for each pound of berries. Blanch berries in boiling water for 30 seconds. Drain. Place 1⁄2 cup of hot syrup, juice or water in each hot jar. Pack hot berries into hot jars, leaving 1⁄2-inch headspace. Fill jars to 1⁄2 inch from top, with more hot syrup, juice or water. | Pints/Quarts | 15/20 | |
| Raw | (Use for any of the berries.) Place 1⁄2 cup of hot syrup, juice or water in each hot jar. Fill jars to 1⁄2 inch from the top with raw berries, shaking gently while filling. Add more hot syrup, juice or water, leaving 1⁄2-inch headspace. | Pints/Quarts | 15/20 | |
| Cherries | Stem and wash cherries. Remove pits if desired. If pitted, treat to prevent darkening. If cherries are canned unpitted, prick skins on opposite sides with a clean needle to prevent splitting. Cherries may be canned in water, apple juice, white grape juice or syrup. Heat to boiling, the liquid of your choice. | |||
| Hot | In a large saucepan add 1⁄2 cup water, juice or syrup to each quart of drained fruit. Bring to a boil. Pack cherries in hot jars, leaving 1⁄2-inch headspace. Fill jar to 1⁄2 inch from top with hot liquid. | Pints/Quarts | 15/20 | |
| Raw | Add 1⁄2 cup hot water, juice or syrup to each hot jar. Fill jars to 1⁄2 inch from the top with drained cherries, shaking down gently as you fill. Add more hot liquid, leaving 1⁄2-inch headspace. | Pints/Quarts | 25/25 | |
| Fruit Puree | (CAUTION: These recommendations are not to be used with Asian pears, figs, tomatoes, cantaloupe and other melons, papaya, ripe mango or coconut.) | |||
| Hot | Stem, wash, drain, peel and remove pits, if necessary. Boil slowly until fruit is soft, stirring frequently. Press through sieve or food mill. If desired, add sugar to taste. Reheat pulp to boiling. If sugar was added, boil until it dissolves. Pack purée into hot jars, leaving 1⁄4-inch headspace. | Pints/Quarts | 15/15 | |
| Peaches | Peaches can be packed in very light, light or medium syrup. They can also be packed in water, apple juice or white grape juice. Prepare the liquid and keep it hot. Dip fruit in boiling water for 30 to 60 seconds until skins loosen. Dip quickly in cold water and slip off skins. Cut in half, remove pits and slice if desired. Treat to prevent darkening. | |||
| Hot | Remove slices from the anti-darkening solution and drain well. In a large saucepan heat drained fruit in syrup, water or juice to a boil. Pack hot fruit into hot jars leaving 1⁄2-inch headspace. When packing halves, place them cut side down. Fill jars to 1⁄2 inch from the top with hot liquid. | Pints/Quarts | 20/25 | |
| Raw | Remove slices from the anti-darkening solution and drain well. Pack raw fruit into hot jars, leaving 1⁄2-inch headspace. When packing halves, place them cut side down. Fill jars with hot liquid, to 1⁄2 inch from the top. | Pints/Quarts | 25/30 | |
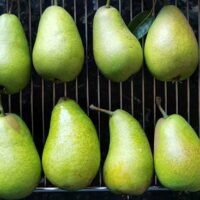
| Pears | Hot | Prepare a very light, light or medium syrup; or heat apple juice, white grape juice or water. Wash and peel pears. Cut lengthwise in halves and remove core. A melon baller or metal measuring spoon is suitable for coring pears. Treat to prevent darkening. Remove slices from the anti-darkening solution and drain well. Boil drained pears for 5 minutes in syrup, juice or water. Pack hot pears into hot jars, leaving 1⁄2-inch headspace. Fill jars to 1⁄2 inch from top with hot liquid. | Pints/Quarts | 20/25 |
| Plums | Prepare a very light, light or medium syrup. Stem and wash plums. To can whole, prick skins on two sides of plums with fork to prevent splitting. Freestone varieties may be halved and pitted. | |||
| Hot | Add plums to hot syrup and boil 2 minutes. Cover saucepan and let stand 20 to 30 minutes. Pack hot plums into hot jars, leaving 1⁄2-inch headspace. Fill jars with hot syrup to 1⁄2 inch from the top. | Pints/Quarts | 20/25 | |
| Raw | Pack raw plums firmly into hot jars, leaving 1⁄2-inch headspace. Fill jars with hot syrup to 1⁄2 inch from the top. | Pints/Quarts | 20/25 |
Boiling Times for Altitude Over 1000 Feet

I know that's a huge guide to wrap your head around, but I hope it's not too complicated to prevent you from trying to store your own fruit preserves this summer.
It's not as hard as you think and it'll definitely make you more self sufficient in food.